
263 Enterprise Mail: MX, SPF, DKIM & DMARC Setup
Configure 263 Enterprise Mail on a custom domain: mxw.263.net at priority 5, mx.263.net at 10, the spf.263.net include, DKIM generated in the admin console, and DMARC reporting.
Aliyun Mail & DirectMail: DKIM, SPF & DMARC Setup
Step-by-step Aliyun DirectMail sender domain verification: the six DNS records, the SPF include values, region-based DKIM selectors and DMARC publishing.
Alibaba Mail (Alimail) SPF, DKIM & DMARC Setup Guide
Configure Alibaba Mail / Aliyun Enterprise Mail on your own domain: mx1-mx3.qiye.aliyun.com, the spf.qiye.aliyun.com include, default._domainkey DKIM and a DMARC record.
Tencent Exmail (WeCom Mail): SPF, DKIM & DMARC Setup
Tencent Exmail — now branded WeCom Mail (企业微信邮箱) — is the mailbox product most Chinese companies use for name@company.com. It is a completely different service from Tencent Cloud SES, which is a sending API with no inboxes. The two share a parent company and almost nothing else: different MX targets, different SPF includes, and a domain registered to one cannot be added to the other.
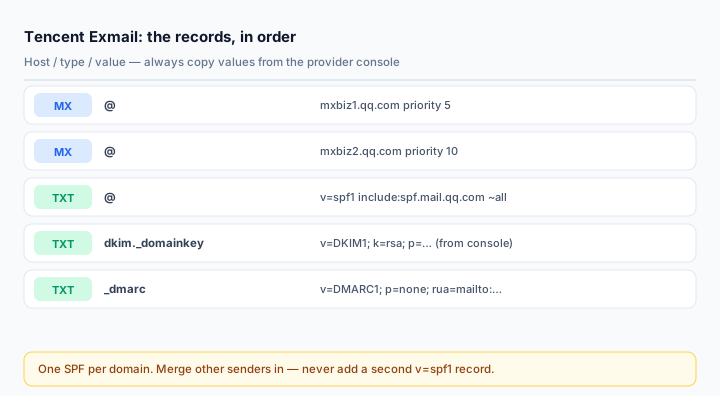
This is the mailbox setup. Four records, in this order: MX, SPF, DKIM, DMARC.
What you need
- A Tencent Exmail / WeCom Mail tenant with at least one paid or trial seat, and administrator rights in the WeCom admin console.
- Your domain added under 协作 > 邮件 > 邮箱域名 and showing as 使用中 (in use). Records published for a domain that is not bound yet will never verify.
- DNS write access at whoever actually serves your zone — DNSPod, Alibaba Cloud DNS, Cloudflare, or a registrar panel.
- A decision about what else sends as your domain: an ERP, a CRM, a transactional API. Every sender has to end up in the same SPF record.
Step 1: MX records — two hosts, and only these two
Point the root of the domain at Tencent's inbound gateways:
@   MX   5    mxbiz1.qq.com
@   MX   10   mxbiz2.qq.com
Lower number wins, so mxbiz1 takes mail first and mxbiz2 is the fallback. Both are required — a single MX is a single point of failure that Tencent will not support.
The mistake that costs people a day: leaving old MX records in place. If you migrated from another provider and the old records are still published, some sending servers will keep delivering to the old mailbox. Tencent's own guidance is to keep only these two. Delete the rest, but check what depends on them first — an old MX may also be serving a legacy address that still receives customer mail.
Verify before moving on:
dig MX yourdomain.com +short
nslookup -type=mx yourdomain.com
Step 2: SPF — include:spf.mail.qq.com
One TXT record at the root:
v=spf1 include:spf.mail.qq.com ~allIf you already have an SPF record — Google Workspace, Microsoft 365, an e-commerce platform — do not add a second one. Two v=spf1 records produce a permanent error and receivers treat SPF as failed, which is worse than having no record at all. Merge the include into the existing string:
v=spf1 include:spf.mail.qq.com include:_spf.google.com include:spf.protection.outlook.com ~allKeep ~all rather than -all while you are still discovering which systems send on your behalf. Soft fail marks a mismatch without rejecting the message, so a forgotten sender shows up in reports instead of silently bouncing. Tighten to -all once DMARC reports have been clean for a month.
The include that does not work here: include:qcloudmail.com belongs to Tencent Cloud SES. It authorises the SES sending cluster, not the Exmail mailbox servers. Using it on an Exmail domain means your own employees' mail fails SPF.
Step 3: DKIM — generate it, do not invent it
Exmail supports DKIM, but no key exists until an administrator creates one. There is no universal selector to copy from a blog post; the host record is generated per domain.
- Open the WeCom admin console and go to 协作 > 邮件 > 安全管理 > DKIM 验证 > 配置.
- Select the domain. Choose the key length — take 2048-bit. Only drop to 1024-bit if your DNS host refuses the longer TXT value, and treat that as a temporary compromise.
- The console shows a host record (something like
dkim._domainkeyor a numeric selector) and a TXT value starting withv=DKIM1; k=rsa; p=. Copy both exactly. Case matters, and a stray space pasted into the middle of the key will fail verification. - Publish the TXT record at that host in your DNS zone.
- Return to the console and click 已完成配置,立即验证. The status must read 已验证. Until it does, nothing is signed.
If you run several domains, each one needs its own key and its own record. A single selector published on one domain does not authenticate the others.
Check it independently of the console:
dig TXT dkim._domainkey.yourdomain.com +shortThen look at a real message: open a mail sent from the mailbox, view the original, and confirm dkim=pass header.d=yourdomain.com. A pass with d=qq.com instead means Tencent signed with its own domain, which will not align for DMARC.
Step 4: DMARC
Publish a TXT record at _dmarc.yourdomain.com:
v=DMARC1; p=none; rua=mailto:dmarc@yourdomain.com; fo=1Tencent's documentation shows a template that routes reports to mailauth-reports@qq.com. That address goes to Tencent, not to you — useful if you only want Tencent's summary, useless if you want to see which third-party service is failing alignment. Publish your own rua mailbox and read the reports with the DMARC Report Analyzer.
Run p=none for at least two weeks. Then move to p=quarantine, and only then to p=reject. Jumping straight to reject on a domain that still has an unauthenticated sender — a website contact form, an old scanner — will start dropping real customer mail with no bounce to warn you.
Verify the full chain
Send from an Exmail account to a Gmail address you control, then open Show original. You want three passes:
spf=pass (spf.mail.qq.com designates <sending IP> as permitted)
dkim=pass header.d=yourdomain.com
dmarc=pass (p=NONE sp=NONE) header.from=yourdomain.com
Cross-check the published side with the SPF Checker, DKIM Checker, DMARC lookup and MX Lookup. If mail is delivered but lands in spam, the authentication is probably fine and the problem is elsewhere — work through why email goes to spam before touching DNS again.
Common mistakes
- Confusing Exmail with Tencent Cloud SES. Different MX, different SPF include, non-transferable domains. If you need SES, read the SES guide instead.
- Keeping the old provider's MX records after migration, then chasing phantom "mail delivered to the wrong inbox" tickets.
- Publishing
-allon day one and rejecting your own website's contact-form notifications. - Leaving DKIM unverified. The record exists, the console still says 未验证, and every message goes out unsigned.
- Pasting the DKIM value with a line break. DNS accepts it, the key parses as garbage.
Frequently asked questions
Can I use the same domain for Exmail and Tencent Cloud SES?
Not the same hostname. A domain registered to Exmail cannot be added as an SES sender domain. Use a subdomain such as mail.yourdomain.com for SES and keep the apex on Exmail, then publish separate SPF and DKIM records on the subdomain.
Does Exmail sign with a 2048-bit key?
Yes, when you choose 2048-bit at generation. 1024-bit is still selectable for compatibility with old DNS panels, but the key is weak enough that some receivers discount the signature.
My DKIM shows 验证中 forever. What is wrong?
Check three things in order: the host record has no trailing dot or duplicated domain; the TXT value has no spaces introduced by copy/paste; and you are editing the zone that actually answers for the domain. A domain delegated to Cloudflare while you edit records in the registrar's panel is the classic case.
Do I need DMARC if SPF and DKIM already pass?
Yes. SPF and DKIM prove the message is legitimate; DMARC is what tells the receiver to act on that evidence, aligns it with the visible From domain, and gives you the reporting that reveals spoofing attempts. Without a DMARC record, a forged message from your domain can still be delivered.
Related Tools
Need Help?
Our tools are designed to be intuitive, but if you need assistance, we're here to help.
About Our Tools
Professional-grade email and DNS diagnostic tools trusted by IT professionals worldwide.