
263 Enterprise Mail: MX, SPF, DKIM & DMARC Setup
Configure 263 Enterprise Mail on a custom domain: mxw.263.net at priority 5, mx.263.net at 10, the spf.263.net include, DKIM generated in the admin console, and DMARC reporting.
Aliyun Mail & DirectMail: DKIM, SPF & DMARC Setup
Step-by-step Aliyun DirectMail sender domain verification: the six DNS records, the SPF include values, region-based DKIM selectors and DMARC publishing.
Alibaba Mail (Alimail) SPF, DKIM & DMARC Setup Guide
Configure Alibaba Mail / Aliyun Enterprise Mail on your own domain: mx1-mx3.qiye.aliyun.com, the spf.qiye.aliyun.com include, default._domainkey DKIM and a DMARC record.
OVHcloud Email: SPF, DKIM CNAME & DMARC Setup
OVHcloud bundles mail with most domains and hosting plans — MX Plan with the domain, Email Pro and Hosted Exchange separately — and each has its own DKIM configuration. That last part matters: if you run both a shared MX Plan and an Exchange plan, configuring DKIM on the wrong one produces a record that never appears in your outbound signatures.
OVH's control panel will also happily generate an SPF record containing a ptr mechanism, which is technically legal and practically a bad idea. This guide covers the correct configuration rather than the pre-filled default.
What you need
- OVHcloud Control Panel access, with the domain and its email service in the same account.
- The domain using OVHcloud DNS servers. If it points elsewhere, you can read the values here but must publish them at the provider that actually serves the zone — check Domain names > your domain > DNS servers.
- Knowledge of which mail plan sends your mail: MX Plan, Email Pro or Exchange.
Step 1: SPF
The value for OVH's shared and hosted mail offers is:
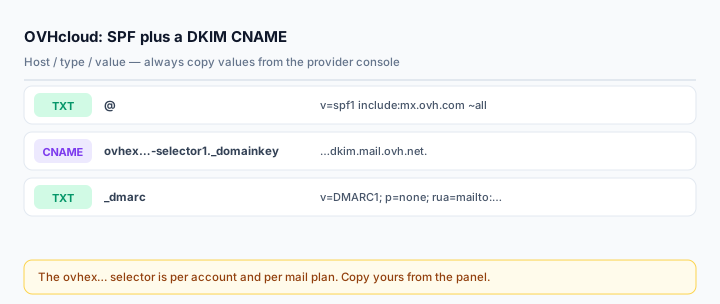
v=spf1 include:mx.ovh.com ~allCanadian domains use include:mx.ovh.ca. The control panel's guided path is Web Cloud > Domain names > your domain > DNS zone > Add an entry > SPF record > Use the SPF for OVHcloud web hosting, which writes the record for you.
The PTR problem. The zone behind mx.ovh.com authorises senders with two ptr mechanisms. RFC 7208 says a ptr mechanism may be ignored by receivers, and many large providers do exactly that — Gmail has not supported it for years. A ptr-only authorisation is therefore not portable: it works for some receivers and fails for others, which is far more confusing than a clean ip4/include.
If you run a Private Exchange server with fixed IPs, publish the addresses explicitly instead of relying on the include:
v=spf1 ip4:203.0.113.10 ip6:2001:db8::10 include:mx.ovh.com ~allIf you already have an SPF record, edit it. Adding a second v=spf1 TXT record makes SPF fail entirely.
Step 2: DKIM — a CNAME to OVH's signing zone
OVH does not hand you a raw public key. It creates a selector and a CNAME target that looks like this:
ovhex123456-selector1._domainkey CNAME ovhex123456-selector1._domainkey.1500.ab.dkim.mail.ovh.net.The selector is generated per account and per mail plan, which is why no article can give you the exact string. Get yours from the panel:
- Web Cloud > Email > MX Plan (or Email Pro / Exchange).
- Select the domain, open the DKIM tab or the email service's general information page.
- Enable DKIM. The panel shows the CNAME host and target.
- Publish the record in the domain's DNS zone, keeping the trailing dot on the target if the panel includes one.
The advantage of the CNAME approach is rotation: OVH can change keys underneath without you touching DNS. The disadvantage is that the record must resolve, so anything that breaks CNAME resolution breaks DKIM — a proxied record on Cloudflare returns an edge IP instead of the target, and a CNAME cannot coexist with a TXT record at the same name.
Verify the delegation before checking signatures:
dig CNAME ovhex123456-selector1._domainkey.yourdomain.com +short
dig TXT ovhex123456-selector1._domainkey.yourdomain.com +short
The second query should return a v=DKIM1; k=rsa; p=... record reached through the CNAME.
Step 3: DMARC
v=DMARC1; p=none; rua=mailto:dmarc@yourdomain.com; fo=1Publish at _dmarc.yourdomain.com. OVH's own documentation is light on DMARC and some of its older templates suggest a policy immediately; start at p=none regardless. Monitor with the DMARC Report Analyzer until every stream — mailbox, website form, any ESP — passes aligned, then move to quarantine and finally reject.
Step 4: Verify
Send from the OVH mailbox to Gmail and read the original headers:
spf=pass (mx.ovh.com designates <IP> as permitted)
dkim=pass header.d=yourdomain.com
dmarc=pass (p=NONE) header.from=yourdomain.com
If DKIM reports d=ovh.net or similar rather than your domain, the CNAME is missing or still resolving to the wrong selector. Check with the DKIM Checker using the selector from your panel, and the SPF Checker for the TXT side.
Common mistakes
- Configuring DKIM on the wrong OVH mail plan. MX Plan, Email Pro and Exchange each have their own; only the one that actually sends will sign.
- Leaving the guided SPF default without noticing the
ptrmechanism inside the include. - Proxying the DKIM CNAME through Cloudflare.
- Publishing the CNAME where a TXT already exists — DNS forbids coexistence at the same name.
- Adding a second SPF record when a second sender appears.
Frequently asked questions
My domain's DNS is not at OVH. Can I still use OVH mail?
Yes. The DKIM CNAME still points into OVH's signing zone; you just publish the records at whichever provider serves your zone. The panel's one-click setup only works when OVH hosts the DNS, so copy the host and target manually.
Why does OVH use a CNAME instead of a TXT key?
So key rotation is transparent and so the record is short. It also avoids the 255-character TXT splitting problem that plagues 2048-bit keys on older DNS panels.
Does OVH's SPF cover Email Pro and Exchange too?
For the shared and hosted offers, yes — include:mx.ovh.com covers them. A Private Exchange server on your own IPs is not covered by that include; publish its addresses explicitly.
Related Tools
Need Help?
Our tools are designed to be intuitive, but if you need assistance, we're here to help.
About Our Tools
Professional-grade email and DNS diagnostic tools trusted by IT professionals worldwide.